Friday, October 22, 2021

Retro has a new home!

As you can see from this blog,  progress on Retro has been essentially stalled for several years.   I decided to make Retro available to others who may be interested and published that fact on the Wanderlodge Owners Forum.     

A gentleman from Alaska contacted me and described a project called " The Alaskan Brain Bus".   He is a doctor and has been supporting the brain injury community in Alaska for some years now.   His hope is to build a bus with which to travel to small remote communities in Alaska to provide them with service for patients with various brain injuries.

I have donated Retro to this project.    I spent about 3 months of available time finishing various parts of the drivetrain work as well as a little new work on the electrical system.   I got new transmission cooler lines and radiator hoses to support the swing radiator  ( kind of flopped - the hoses are too long and kink when the radiator is closed.   Could possibly be improved to where the swing functions properly. I ended up putting shorter non-swingable hoses on the radiator when closed)   I re-wired the battery and finished the alternator.

Dr. Grove flew down from Alaska and we worked on the bus for 3 days together including a couple of test drives.  We found the driveline brake parts from a bus parts dealer and installed the emergency/parking brake which was a problem on this bus since I first got it.

Dr. Grove drove the bus to Tacoma where it was loaded on a ship for transport to Anchorage.   The bus is now parked behind his clinic and he is continuing the work to convert the bus to a mobile clinic.

Here is the URL for the brain bus project:  https://www.alaskabrainbus.com/

Thank you for your interest in this project,  please look at the brain bus website to follow along in Retro's future!

Jim Morton


Sunday, October 29, 2017

Quick Update

Got sidetracked again - had to fix a couple of cars for the kids-  back to Retro real soon now.  I actually ordered and have received a new alternator and radiator bypass hose.  Felt good to do something!    As soon as I get the Grand Prix running properly  ( had to do the head, intake and exhaust gaskets ) I should be back to Retro.

Sunday, May 7, 2017

Still working - cooling system, gas tanks and more!

Despite my lack of posting,  I have been working through the issues since I pulled Retro's radiator.    You can see in the first picture that the water pump inlet hose was run through the power steering pump belt.  This seems like a bad idea  ( I think a P.O. may have replaced the water pump with the only one they could find  - perhaps  pre-internet,  who knows? ).   I don't like the idea of having to drain the cooling system if the power steering belt breaks.  I found a pump which the inlet is straight,  not bent forward so that the hose could be routed around the steering pump.   The pump I got did not have a pulley on it, so I took the new pump and the old pump to the local community college and one of the instructors there used a hydraulic press to put the old pulley on the new pump.


I realized that I could mount a couple of pieces of angle iron on the radiator frame to replace the bar running across the front of the radiator from one side of the body to the other.  This will allow me to swing the radiator.  The function of the bar was to brace the grille in front of the radiator, so being attached to the solid (I hope) swing radiator frame will be good for that purpose.  There is a picture of the refurbished radiator, but not the frame and support bar - next post for that.

I removed the plumbing wrapped around the front of the engine - one side was for the rear heater,  the other for the front one.  It looks like it grew over the years - there were multiple valves in the same line in some cases, I am cleaning all that up and will have two valves in each circuit - one for hot water feed and one for cool water return, so I can isolate a loop in case of a problem.   The rear heater feed will split off to run the engine heat circuit of the water heater.   I have marked all the original hoses and am going to replace all the rubber hose with fresh new high-quality hose.

I read some advice to put an engine fan and shroud back on and I took that to heart.   I found and bought the "High fan mount"  that attaches to the plate on top of the water pump,  but was not able to find a modern fan clutch and fan that would fit ( I had several phone calls with flex-a-lite and hayden ) the only fan I could find was an original equipment steel fan.  I decided to re-engineer the electric fan cooling system and am settling on 4  12 inch fans  for the 24 X 26  radiator.   I will build a frame and shroud for these fans,  along with two multi-speed controllers.   I am also going to replace the original ?55A?  alternator with a high-output self-regulating  200A model.  This will provide plenty of current to run the fans.

Another issue that I worried about was the condition of the inside of the gas tanks.  I built some blocks to put under the wheels,  and also jacked up the frame and placed jack-stands.   The suspension is about half-loaded, and if a jackstand fails,  the tires are nearly 4 inches off the ground.   This height gave me room to slide the gas tanks out from under the coach.  I only had to grind one of the nuts off - most of them came pretty easily.   I got the tanks out today and pressure washed the outside,  I will be taking them to San Leandro  Radiator  ( the folks who restored my radiator )  to be refurbished - sand-blasted inside and then coated with kreem.    I also discovered the broken wire for the front-tank fuel gauge sender,  so I am hopeful to get that working.


I expect the fuel tanks,  alternator, new transmission cooler hoses (needed for the swingification of the radiator) / heater lines and coolant hoses to take me into the June timeframe, based on daddy couldya timesinks and the accumulation rate of expendable dollars.  I will post more then.

Sunday, January 29, 2017

Keeping Busy

Recent activity includes

Removing generator for servicing

Removing fridge to make space for the new water heater

Removing radiator for service.

Here are some pictures of the radiator removal:


I will go into more depth and description of this a bit later - been too busy working to write much, I need to regroup and catch up!   I will also take and post some pictures of the fridge tear out and where the water heater is going,   along with pictures of the generator clean up / tune up.

Stay Tuned!

Friday, November 18, 2016

Heater installation

Retro's original heaters are radiant gas heaters, and I do not really trust the 50 year old units.  They look fine, but I am not certain that they would not leak CO into the living area and they do take a lot of room.   I already removed one as documented in an earlier post,  and I am replacing that heater with a forced air RV furnace.   I am installing the furnace in the area where the original water heater was:


This A.C. Electric only water heater is also being replaced by a gas / electric / motor-aid water heater that will be installed where the refrigerator was.

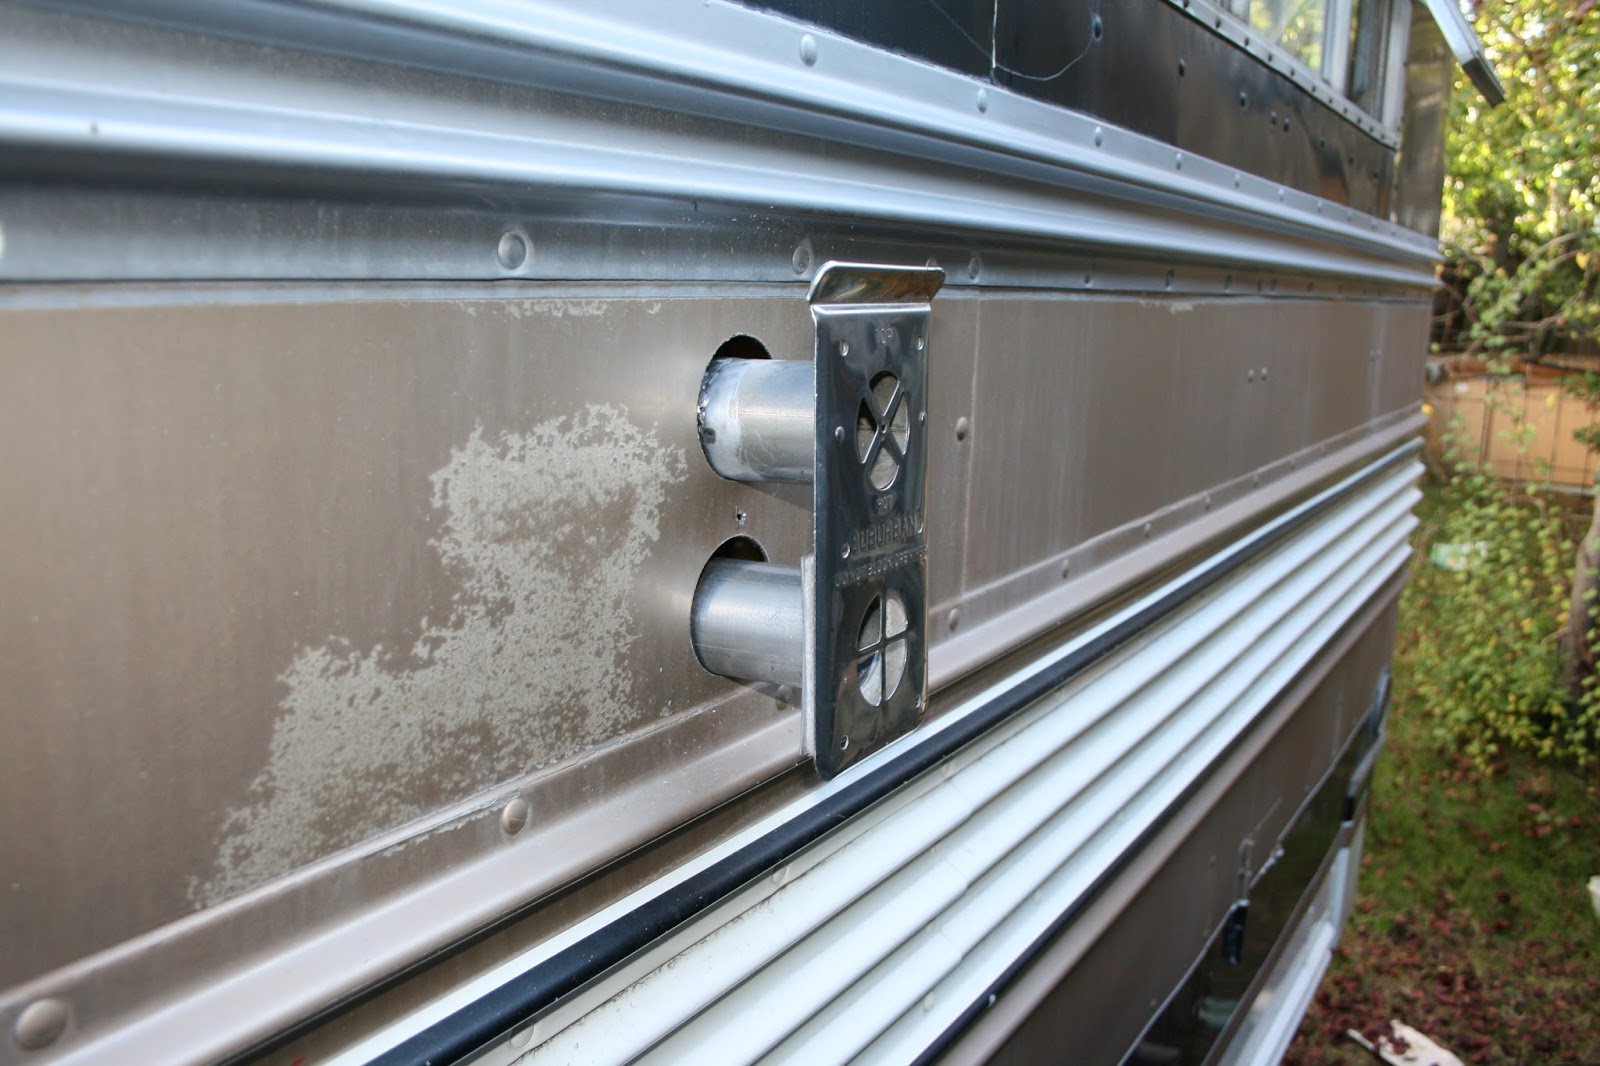
One reason for this location for the heater is that the side of the coach has rub-rails (bumps) and there is a gap between them which will nicely fit the combustion air intake / exhaust plate for the furnace.
One benefit of this installation is that the space above the heater becomes available for a closet or pantry, depending on where I put the door.  The combination of water heater and the old radiant heater took a lot of space.

After removing the water heater I installed a rail for the heater shelf to sit on and cut a new shelf out of plywood:


The front face of the heater exhausts the warm air and needs to be flush with the front of the cabinet.  The intake / exhaust tubes for the heater are too short to reach the outer wall of the coach, so I am going to need to extend them. (longer pipes can be purchased, but I could not find a reliable source for the parts - and I own a MIG welder!


Intake / Exhaust too short to reach wall


Original exhaust pipe cut to weld in as extension 
Extensions in place
It reaches!
The holes are the size specified in the heater manual.
Plate screwed down and sealed


Overall not terrible.   The plate is sealed with Automotive RTV which will tolerate the temperatures of the exhaust plate.   The welding is okay, and I will wrap some aluminum tape around the joints to ensure that they are gas-tight (they look gas-tight,  but I have no good way to really test them - belt and suspenders time! )

I am going to use threaded metal inserts on the wood platform for the heater and screw the heater down with 1/4 x 20  machine screws.  That will be better than the sheet metal screws provided with the heater - I will be able to remove the heater for repairs without damaging the screwholes in the wood.

In addition to working on the heater,  I put a coat of spar polyurethane varnish on the subfloor in the back.   I will add another coat or two.   This is simply to help the wood resist the effects of any moisture that may happen.   I am thinking about installing some sort of moisture / water sensors into the walls and under the carpet to alert me in the event of water leaks either from outside,  or from the water system which is located in the bedroom.   Water leaks are the greatest threat to retro's health in the long term.

New bedroom subfloor - needs more spar varnish.


I also have been working in the living room - took apart the damaged wall and opened up the wiring / control center.   I have been verifying the wiring to the original factory schematics provided with Retro.    I want to move switches down to the dash for things like the heaters / defrosters and dash fans.   It is difficult to grab the correct switch on the overhead panel while driving.   I will probably leave the generator controls up there.  I will make a new panel face so that it looks correct. 


So many things to play with!


This window frame leaked - new butyl tape on order.


Not very sanitary wiring.  The wires on the two round meters on the left have 120VAC on them!


It is good to be making progress again !   Of course the next two weekends,  including the 4 day Thanksgiving weekend are slated for rain!  I suppose I can work inside the rig well enough. 

Near term projects:

Scope out the wiring and figure out how to split the chassis and house electrical systems in a way that makes the most sense

Remove generator for restoration  - it runs,  but the governor does not work and it needs general cleanup and some rubber parts and hoses replaced.

Remove radiator for rodding out and evaluation

Till Next Time  


Sunday, October 9, 2016

Floor IN!

I got the new plywood for the bedroom floor in today,  and the drivers side small rear window.
#14 X 1 1/4 screws holding the wood to the metal subfloor.


I hope to keep working at it - it feels good to be putting at least some of it back together!

Sunday, August 21, 2016

Time to drive

It has been a while since I have worked on Retro, but most of my distracting tasks have been finished and I am getting back to the bus.   Since I have not really driven Retro much since I got him home,  I thought I should take him for a drive before putting him in drydock for a while.   I need to pull the radiator and get it rodded out,  and with the front of the engine compartment open I think I will be doing lots of little jobs on the front of the engine

     1.    Re-work the electric radiator fans to get more coverage of the radiator - maybe add 2 more fans.,
     2.    Work on the wiring for the alternator / regulator -  Retro's ammeter jumps all over the place when I am driving.  I think the load and alternator output should be relatively smooth.

     3.   Re-work the wiring for the various gauge sensors - maybe add a few more things to be measured.   The trans temp gauge does not work for example, and it seems kind of important.

     4.   Evaluate the possibility of an engine driven air-conditioning system.

     5.    Evaluate the possibility of a swing out radiator.


Anyway,  I figure Retro will not be drivable for at least two months.   I wanted to get him moving and let all the fluids circulate and heat up etc.    So, I disconnected the power cables and secured all the loose gear inside Retro and opened the gates.  

Retro started up easily and we eased down the driveway.   I took him around the block and then parked in front of the neighbors house while I closed the gates and garage.    Retro has no real parking brake, only a Mico brake-lock,  so it is not trivial to park him on a sloping street.   I always put chocks on the wheels, even with the Mico activated.

Gates and doors secured,  we got back underway.   I had filled the wastewater tank (retro has only one) and thought I would head out to Tracy, Ca.  and hit I5 south.  There is a rest-stop with a dump station a mile or so south of the merge onto I5 S.   I made it almost a mile before Retro started grumbling.  He was acting fuel-starved.  I was operating on the rear fuel tank, and the gauge said I had half a tank of gas.    I  had also put some gas in the front tank, but only perhaps 4-5 gallons or so to test the generator.  I was on a twisty turny bit of 2 lane road when the motor quit,  but there was a driveway into a school facility 50 yards ahead of me and no on-coming traffic,  so I managed to coast into the driveway (which is a gravel wide spot in the road with the driveway perhaps 100 feet off the road)   and stop and think a bit.    I played with the fuel pump selector switch a bit and then tried the starter and sure enough,  he started up.   I turned him around and headed back toward town quickly deciding that I could empty the tanks at the RV park at the local fairgrounds, or maybe just go home.

Retro was cooperating so I passed by the cross street back to home and headed toward the fairgrounds -  I really wanted to empty the tank before starting a big work session.   After a few miles, Retro started getting balky again, eventually stalling out on a 2 lane 35mph surface street.  Fortunately,  it was an easy spot for cars to go safely around me,  and with the emergency flashers on, there were no close calls.    I decided to switch to the front tank, which the gauge said was empty, but I figured 5 gallons out of 55  probably does not move the needle.    I switched the fuel selector, and the fuel pump switch and Retro started right up.   I circled a block and went back to Safeway and got in line for some gas.  I put about 25 gallons in the front tank,  and 30 in the rear.   I switched back to the rear tank  (which I trusted more because it was the one that got me from Los Angeles back up to the S.F. Bay area) .   I then proceeded to the fairgrounds to use the dump station there and discovered that the fancy Thetford swing and extend sewer hose thing had a broken hose in it.   I discovered this by inspection rather than flooding the area,  and I got an extension hose from the storage bay and rigged it into place - I had to move to a different area to get close enough to the dump pipe, but managed to get it emptied without making a mess.   I will have to replace the dump valve, but that is a chore for a different day :)

When I got in to leave the fairgrounds,  Retro was again acting fuel starved.   I switched back to the forward tank and went home.   I will add an inspection and re-work of the fuel system to the list of chores for this work cycle.

I hope to be working on Retro more regularly,  though I do have some competition for weeknights - My two welding classes  ( 2 nights of actual welding  and one of book-learning ) started last week, and the classes run from 6:30 - 9:30 ish,  so no work on the coach those nights.  (not that I am much of a night worker anyway,  I  am more of a night-comfy-chair-holder-downer given a choice).

Till next time....

Sunday, June 26, 2016

Rear Windows

I have been working on the rear windows most recently.

One of the windows had a definite water leak, and the water from that leak is what ruined the street-side rear corner area of the bus.


The first picture shows the damage on the driver's side, and the second one shows how the windows are installed - the glass is held in place with a rubber gasket between the body of the bus and the window glass.  The rubber on two windows is cracked and very brittle.  On the third window, (the drivers side rear window)  the gasket is different than the other two.  It is still pliable, but is a little loose and this is where the water has seeped in.  It is obvious that someone tried to seal it with silicone sealant,  but this is not effective for this application.


I used a chisel to carefully remove the brittle rubber.


The glass all came out without breaking.


The paint on the inside has unstuck from the steel in some places.   Also,  you notice that there are an inside and an outside body panel spot-welded together.   They are not the same height!  This means that part of the body is thinner than in other parts of the window.   I am going to weld a bead along the top inside edge of the outer body panel to make it thicker.   I will grind it down since my welding leaves something to be desired.   I also plan to coat it with epoxy to make it smoother.

Here is another shot of the rear corner before removing anything - a reference for how it goes back together!


So far,  I have welded, ground,  epoxied and sanded the metal clean.  I have primed and painted both the inside and outside.    I removed the aluminum strip from the outside which was below the windows and am polishing it up before re-installing it.   Always lots of cleaning and polishing work available on Retro!


Sunday, June 12, 2016

Floor patched

I have patched the big hole in the floor where the water tank drain was!

I bought a MIG welder (seems like a handy thing to have if you own a 50 year old all-steel motorhome)  from Craigslist.  It was a pretty sweet deal including the cart and a gas bottle, and a very slightly used Lincloln 140 welder.


I worked to get the steel patch as close of a match as I could to the hole, it had some pretty good gaps part of the way around, but was pretty tight in some places.


I welded carefully - not running a bead too far at a stretch so that I would not overheat the thin steel and cause it to sag.  In some parts of the circle I was filling a gap of perhaps 3/8 ".


As you can see above, it is pretty lumpy and bumpy at this point, so I got my power grinder out and spent the next hour grinding away metal that it seemed to take mere minutes to put in place - 15 minutes of welding and an hour of grinding!


At this point, the deck is smooth enough to install the wood over,  so I am done grinding.  I painted with some primer to match the rest of the floor.  I also sprayed underneath with some rust-oleum undercoat paint.


I am pretty happy with this patch - it is my first experience welding.  I have signed up for welding classes at the local community college,  I would really like to KNOW what I am doing instead of guessing.

More to follow!

Thursday, May 12, 2016

Slow time - other projects

Well, I have not been working on Retro much for the past month or so,  I have been busy with some other projects that came up.   I did buy a used MIG welder, and also managed to sign up for some MIG welding classes (seemed like a good idea).

Took Retro for a spin last weekend, never good to have a vehicle just sit.   I put gas in the recently drained front tank, so now the generator has access to fuel,  I just need to get it connected to the battery so I can try to start it.  I am sure it will need some work to get it running.   

I should be able to get back on task with Retro in the next week or so.

My current idea of a task list is:

1.  Weld patch on floor where water tank drain was.
2.   Patch screw holes where old wood subfloor was screwed to steel deck
3.   Replace rear window seals - current seals are dried out and cracked,  is cause of significant rainwater leak into bedroom - probably responsible for part of the damaged wood.
4.   Replace wood subfloor in bedroom

That should keep me busy for a while !

Thursday, April 14, 2016

Rust Treatment

Retro has a number of spots where water has leaked in, particularly in the bedroom along the rear wall.  The water soaked some of the wood, destroying it and also got under the floor wood and rusted the 14 gauge steel deck in some spots.


I am using a product called Ospho to treat the rust.  According to it's manufacturer it will convert the iron oxide (rust) into iron phosphate, which is a stable metal.  After treatment and conversion, I will paint the deck with some self-etching primer.    This may be a slight problem, since the metal is galvanized and most paints do not stick to galvanized metal.  The rust-oleum self-etching primer was the only kind that did not indicate on the label not to use on galvanized metal.    After I bought some I investigated further on the rust-oleum website and it said there that it was not for galvanized metal, but I am hoping that after treatment with the ospho,  the paint will stick.   In any case,  the paint will be under the wood floor and I am not concerned with appearances.  I was hoping for some additional rust protection, but if the paint does not stick, it means the galvanized coating is still good and that should protect against rust, particularly since there should be no more moisture standing on the steel.

I think I am going to embed some moisture sensors in the walls and floors around the water system and plumbing,  maybe even under the windows.   The sensors should be cheap, and I can build a little arduino based system to monitor them and let me know if a leak starts.

Here is the floor with some ospho on it:


I will post more pictures after this weekend.    These are from last weekend.

Here is what I worked on tonight:

That is fresh wet water from a leak in the rear window (left side,  right of picture)  from the rain we had a few days ago.  It is neat to have the walls stripped and see where the leaks are.   I am going to try to find some new rubber seal that goes around the window and holds it into the bus.  If I can't find new seal, I will work to clean up what is there and possibly seal it with an appropriate caulk.  I think I will be able to find some seal that will work, though.   The floor was dry tonight, so I wire brushed all the loose rust away,  vacuumed the dust and painted ospho on.   The ospho is fairly dangerous to work with - it contains phosphoric acid as well as other stuff.  It stinks and can burn skin, so protective equipment is required when working with it.   I put a fairly small amount in a paint mixing cup - perhaps 10-20 cc's or so.  Then I brush it on and work it into the rust.   I spread it pretty thin - it is about as viscous as water.  If needed I will go back and do another coat tomorrow, let it dry till Saturday and then spray paint Saturday afternoon.

I may rent a MIG welder this weekend and patch the hole(s) in the floor.   There is about a 4" hole where the water tank drain was,  and lots of small holes - perhaps 1/8"  where the wood was screwed to the deck.   I got a nice piece of 14Ga steel and a box of 100  #14 X 1-1/4  screws - exactly like the ones I pulled out of the floor. If welding the small holes closed is impractical, I have some JB weld to seal them up with.  I just don't want the wood of the floor exposed to the outside if I can help it.

 It is exciting to think that the step of installing new 5/8 marine plywood onto the deck is coming up - perhaps even this weekend!    I will probably paint the wood with some epoxy paint - perhaps I should let it dry for a week before installing the floor.   I will read about epoxy paint and try to figure out the best thing to do.


Sunday, April 3, 2016

Progress!!

Well, it's been two weeks and I have actually made some progress on Retro.  At first I was sort of... stuck.   I figured I needed to get the bedroom cabinets out in order to remove the wall paneling, some of which had been water damaged.  There were screws holding the top of the front of the cabinets to the ceiling, but I was uncertain of how the rest of the cabinets were held in.   It turned out to be a stack of 1X2 furring at the back which the rear of the bottoms of the cabinets were nailed into.  The furring stack was screwed to the metal frame of the bus.   Using a prybar I was able to get the cabinets out without too much damage,  and when I replace them, I will screw the back to the stack of furring strips so that it can be removed more easily in the future.

After getting the cabinets out, the wall paneling came pretty easily, I had to cut some sections but mostly I was able to pry it off.    Some of the fiberglass insulation was soaked and moldy, all the rotted wood and moldy fiberglass went to the dump.   Fortunately the specially cut corners were intact and I can use the old wall panel sections as templates for the new replacement wood.

After getting the walls out, I took out the aluminum water tank, plumbing and water pump. Then  I ripped up the carpet - both the "nice" carpet in the walkway and the industrial soundproofing carpet which had been under the beds.    This exposed the wood underlayment of  the floor,  some of which had also been rotted away from water leaks over the years.


Now the metal floor of the bus is exposed and there are a few issues to take care of!   First there is about a 4 inch hole which had been cut for the fresh water tank drain / cleanout.   Having looked in the tank (uugghh!)  I am pretty sure I am replacing it with a shiny new plastic one, so the hole can be closed and a new (smaller) hole installed for the new tank.  I want to weld a plate into the hole (or over it perhaps) to restore the structural integrity of the floor.   Also,  the floor is rusted in several areas.   This will be a job for Ospho rust converter.   The Ospho will convert the rust into Iron Phosphate, which is a stable form of metal.   I will then paint the entire floor with a good rust-resistant primer.


In addition to the demolition on the bedroom,  I removed the Jacknife sofa from the living room.This will let me remove and replace the water damaged wall panels which were behind the couch.

This brings us about up to date.
The next few weeks will see us working on:

Continued removal of bedroom floor,  covering drain hole,  fixing rust, priming floor
Replacing wood sub-floor in bedroom
Replacing wood furring strips in bedroom
Demolition of walls in living room
Replacing wood furring strips in living room
Replacing window framing (plywood) in bedroom and living room.


Maybe I will update in one week instead of two next time.